
Blogging is becoming popular among people and it is really noble to see many are sharing their thoughts and methods to handle various situations and technologies. Bloggers using blogger.com (BlogSpot) soon would decide to switch to a self-hosted WordPress site where they will have full control over their blog.
If you are one of them, then here is your non-too-techie tutorial for Blogger to WordPress migration steps without losing your Google rankings and valuable visitors.
This article has been put up in its most simple way along with respective images wherever possible, so that even users with less or no technical expertise as well can do migration on their own.
Still you don’t feel comfortable and need a better solution? Don’t panic! We are here to do the migration for you in a very reasonable cost… Hire us…
Okay, now with that note let us see how to migrate your blogger to WordPress site
Step #1 Precaution and Preparations
First of all as a safety precaution, take a complete backup of your blogger content including posts, comments and XML template.
Furthermore, before starting your migration, you have to be prepared with the below initial set up:
1. Buy a Web hosting service provider
The first thing you would need to have your own self hosted WordPress site is a Web hosting service provider.
It is the space where you will host all the files related to your blog which will be accessed online.
I’d strongly recommend a little unknown host called startlogic. I have been with them for the past 10 years.
2. Register a Domain name for your blog site
Along with your web-hosting provider you need to register a domain name for your blog site.
This is what the user type to access your site. For example like http://sample.com
3. Install WordPress
Next, you have to install the WordPress on your web host.
Once all these three steps are done you are ready to go ahead with the migration process.
Step #2 Importing your blog into WordPress
Importing your blogger contents to WordPress site is very easy process. WordPress has an in-built importer utility which helps you to import your blog’s posts and comments completely.
- To do that, go to WordPress admin Dashboard page and select Tools -> Import -> Blogger.
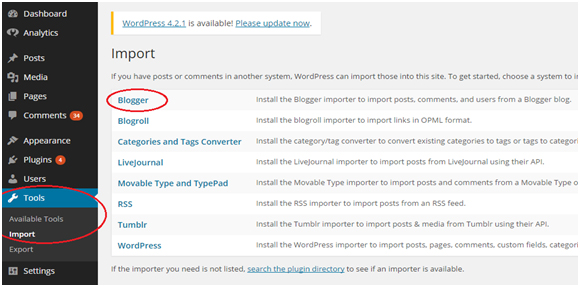
- On clicking Blogger option, Blogger importer screen will pop-up. Click the “Install Now” button and WordPress will start installing the importer plugin.
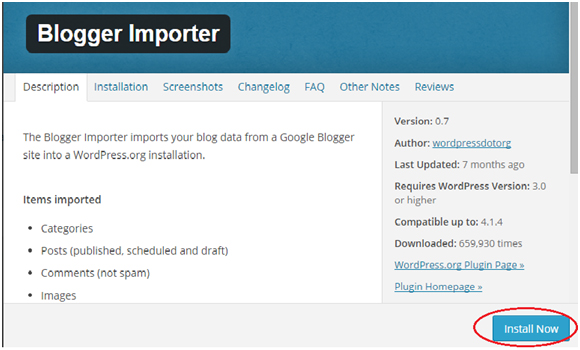
- Once installation of the Blogger importer is completed, click on the “Activate Plugin & Run Importer” link to proceed further.
- Next you will be prompted to “Authorize” the WordPress to access the blogger. On authorizing you will be taken to the blogger page (i.e.,) Google accounts page where it prompts you to Grant Access to the WordPress site to access and manage your blogger.
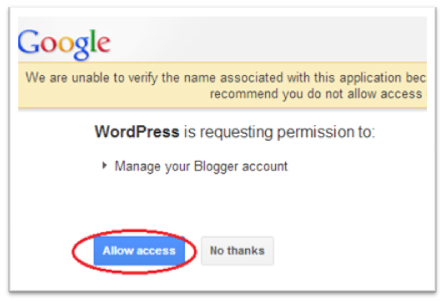
- On clicking “Allow access” button, you will be taken to your blogger page where you can see the list of all your blogs / posts.

- Just a single click on the “Import” button against the post you want to import will consequently move all the contents to your WordPress site. As a result, this will import all the contents and comments from your blogger to your WordPress. While doing so, the Import might hang in between, but you can see the “Continue” button in the place of Import button. Therefore, keep selecting the “Continue” button till the import is completed.
- Once the import is completed, the button label will finally change to “Set Authors”. Furthermore, on clicking this button, it will redirect you to a page where you can assign your blog to an already existing user or in case of another user click on “add user” link in your WordPress blog and set the author names.

Hurray! You have successfully completed the process of importing your blogger content into your own WordPress site.
But wait! Now comes the crucial part. You have imported only the contents. Still, you want your users certainly to land on the exact page on your new WordPress site and above all, you want to retain your blogger site’s SEO ranking, traffic, visitors and subscribers. Let us continue with our tutorial for the steps to achieve these.
Step #3 Setting Permalinks for proper mapping
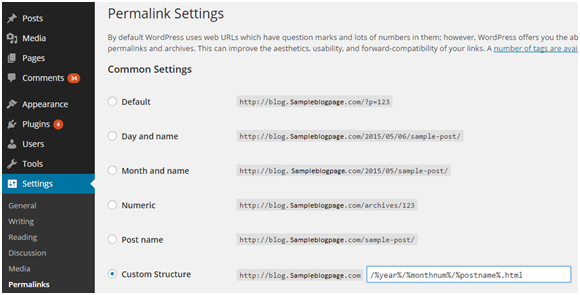
You would need to maintain your new website URL structure to be similar to your Blogger URL. This helps to retain your SEO ranking and traffic. WordPress has the feature to set up “Permalink” that is used to set permanent links for your distinct entries in blogs.
To set the permalinks, in the WordPress admin dashboard page select Settings -> Permalinks. In the permalinks screen, either choose “Month and name” as your permalink structure and enter the value resembling your blog URL or choose “Custom Structure” and enter the value that matches your blog permalinks like /%year%/%monthnum%/%postname%.html
Step #4 Redirecting to your new WordPress site
Here comes the most vital part of your migration. Not leading your regular users to exactly the similar page in your new website and not intimating the search engine about your new website will make you to lose your blog’s long term earned ranking and recognition. So let us see on how to redirect the visitors from your old blogger page to the new website.
Follow the below steps for enabling redirection on your Blogger /BlogSpot account.
- Login to your Blogger account
- Go to Settings -> Template
- Template screen will pop-up. Scroll down to the page and click the link “Revert to classic templates”.

- After reverting to the classic template page you will have the “Edit Template HTML” text area.
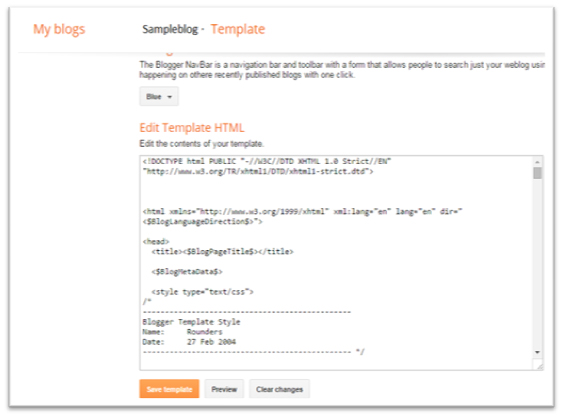
- Remove the existing contents and enter html code to display a redirection message along with a link of your new website to your visitors. Make sure you click the “save template” button to save your changes. Now you are done with the redirection on the blogger side.

- Next you need to set up redirection on the WordPress side. To do that, in your WordPress admin dashboard select Appearance -> Editor. Open the file php and in the beginning of the file enter the code for redirecting from the blogger to new site. Mostly this file will be available in all WordPress themes folder, if not, write a new file in a text editor and FTP it manually. Also, there are some WordPress plug-in’s available to perform the “301 redirection” for your site. You can also make use of it, instead of writing your own code.
That’s all! You are done with the most critical but important task of the migration. Now go ahead and publish your new website.
Step #5 Import Images and Redirect RSS feeds
Though your new site is published and working as you desired, taking one more extra step will be a value add-on to your site.- During import some of the images will be still embedded in the blogger site and not available in WordPress media library or otherwise its post URL may be still pointing to the old source. Use appropriate plug-ins and import all the images into your WordPress media library. Also there are plug-in’s available to update the post URL values, using which you can change the URL values of the images.Doing this reduces the need of maintaining the old blogger site for a long time.
- As the subscribers will not be aware of the migration of your site, you would need to redirect the RSS feeds as well. To do that, in your blogger account select Settings -> Other. In the “Site feed” section, click on the “Add” link against “Post feed redirect URL”. And then enter your new website’s feed URL in the text box displayed. This will move the existing subscribers to your new feed automatically.


Blogger to WordPress Migration
Blogging is becoming popular among people and it is really noble to see many are...
Share this link via
Or copy link